


Views: 0 Author: Site Editor Publish Time: 2026-10-28 Origin: Site


Taking delivery of a heavy-duty ceramic grill is an exciting moment for any barbecue enthusiast. The gleaming exterior glaze and robust metal hardware promise years of backyard feasts. However, firing it up for a high-heat cookout right out of the box is a critical engineering mistake. You must season the unit first. This initial process protects the internal components, cures the factory adhesives, and ensures a safe cooking environment. In this technical guide, we break down the precise mechanics of curing your equipment to guarantee decades of reliable performance.
Before diving into the exact steps, we need to look at a major shift in the outdoor cooking industry. Market data shows a massive surge in consumers abandoning traditional thin-metal gas grills for dense ceramic cookers. This transition is fueled by the unmatched heat retention and fuel efficiency of ceramic materials. Consequently, industry experts note a corresponding spike in user-induced damage during the first few days of ownership. The primary culprit is almost always skipping the initial curing phase. Proper preparation is entirely non-negotiable. It prevents irreversible damage to the ceramic matrix and establishes a non-toxic baseline for your food.
Core Principle | Objective | Critical Action |
|---|---|---|
Safety First | Eliminate factory residues. | Burn off manufacturing oils, dust, and chemical residues left over from the factory assembly line before cooking any food. |
Protect the Parts | Prevent cast iron rust. | Apply oil to cast iron components like the top vent and grates to build a rust-proof polymer layer. Never oil the inner ceramics. |
Low and Slow | Prevent ceramic cracking. | Keep the first burn strictly under 300 degrees Fahrenheit or 150 degrees Celsius. High heat causes trapped moisture to expand rapidly, leading to thermal shock. |
Proper Fuel | Maintain clean airflow. | Always use pure natural hardwood lump charcoal and natural fire starters. Never use lighter fluid, as chemicals will permanently ruin the porous ceramic. |
When you invest in a premium ceramic cooker, you are acquiring a complex culinary instrument. It is engineered from porous clay mixtures, high-temperature industrial adhesives, and heavy metals. Operating it at peak temperatures immediately will compromise its structural integrity.
During manufacturing and global freight, various industrial byproducts inevitably accumulate. Machine oils lubricate the metal hinges. Fine ceramic dust and packaging particulates settle deep inside the firebox. The first burn acts as a vital thermal purification. It safely vaporizes these non-food-grade residues. Your inaugural batch of food will not be ruined by acrid chemical smoke.
A ceramic grill relies on its felt or fiberglass gaskets to maintain an airtight seal. This seal is the mechanical secret behind precise temperature control. Manufacturers attach these gaskets using specialized high-temperature adhesives. A gentle low-temperature heat cycle allows this glue to cure and bond properly to the ceramic rim. If exposed to extreme heat immediately, the uncured adhesive melts and the gaskets peel away. Furthermore, a slow burn allows residual atmospheric moisture trapped inside the porous ceramic shell to evaporate gently. This prevents microscopic fractures.
The interior ceramic walls require absolutely no oiling. The metal components, however, demand immediate attention. The cast iron top vent, commonly known as a daisy wheel, and the heavy cooking grates are highly susceptible to rust. Ambient moisture and oxygen will attack bare iron quickly. Applying a thin layer of cooking oil and subjecting it to low heat triggers a chemical reaction called polymerization. The liquid oil transforms into a hard protective shell. This bonds directly to the iron, creating a natural rust-proof barrier.
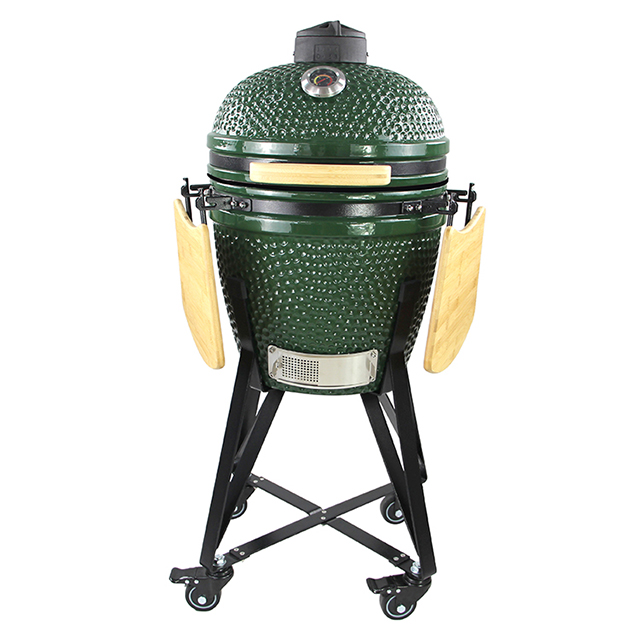
Proper seasoning begins before you even touch a bag of charcoal. The unboxing phase requires a methodical inspection. You must ensure the unit survived transit and is structurally sound for its first thermal cycle.
Carefully examine the exterior glaze and the interior firebox components. Pay close attention to the fire ring and the fire grate. Look for any hairline cracks caused by rough freight handling. Minor cosmetic crazing, which looks like spiderweb lines in the outer glass glaze, is completely normal. Deep structural cracks in the internal firebox require immediate customer service attention before you light any fire.
Ceramic grills possess immense weight. The constant vibration of transport frequently loosens factory-assembled hardware. Take a wrench and a screwdriver to inspect all metal bands securing the ceramic dome and base. Check the hinge bolts and handle screws. The bands must be tight enough to support the dome weight. Avoid over-tightening to the point of stressing the ceramic shell. Securing the hardware prevents the dome from slipping out of alignment during its first heat expansion.
Remove all packaging materials. Pay special attention to hidden styrofoam bits inside the bottom draft door. Use a slightly damp microfiber cloth to gently wipe down the interior ceramic walls, the firebox, and the exterior shell. This step removes loose cardboard dust and packing debris. Allow the grill to air dry completely for at least 30 minutes before lighting.
Using the correct fuel and supplies is entirely non-negotiable. The wrong materials will introduce toxic chemicals into the ceramic matrix or severely clog the airflow systems. When preparing your premium 18 inch Kamado grill for its maiden voyage, gather these specific items.
A ceramic cooker operates efficiently because of its aerodynamic internal shape and clean airflow. You must use pure natural hardwood lump charcoal. Avoid compressed charcoal briquettes entirely. Briquettes contain chemical binders, coal dust, and fillers. They produce vast amounts of excessive ash. This ash quickly fills the bottom chamber, blocking the air intake vents and suffocating the fire. Lump charcoal burns hotter, cleaner, and leaves minimal ash residue.
Never use liquid chemical lighter fluid under any circumstances. The unglazed interior ceramics are highly porous and act exactly like a sponge. If you squirt lighter fluid into the firebox, the ceramic absorbs the petrochemicals permanently. This taints the flavor of your food for the entire lifespan of the grill. Rely on natural fire starters like tightly rolled wood wool, paraffin wax cubes, or a clean electric charcoal lighter wand.
To season the cast iron grates and top vent, you need a cooking oil with a high smoke point that polymerizes effectively. Avoid standard olive oil or butter. Their low smoke points cause them to burn quickly and turn rancid. This leaves a sticky and bitter residue on your hardware. Grapeseed oil, canola oil, or avocado oil are excellent choices.
Following a strict Standard Operating Procedure ensures the curing process is both effective and safe for your new equipment.
Ensure the cast iron cooking grates and the dual-action top vent are clean and completely dry. Fold a paper towel, dip it lightly into your chosen high smoke-point oil, and rub a micro-thin layer over all exposed surfaces of the cast iron parts. Wipe away any excess oil immediately. Pooling oil becomes gummy rather than forming a hard protective shell. Never apply oil, water, or chemical soap to the internal unglazed ceramics.
Open the bottom draft door entirely to maximize oxygen flow. Remove the cooking grates temporarily. Pour a moderate amount of natural lump charcoal into the firebox. Manually arrange the charcoal for optimal airflow. Place larger fist-sized chunks at the very bottom resting against the cast iron fire grate. This ensures air flows freely upward. Place medium and smaller pieces on top. Do not overfill the firebox. For a seasoning burn, filling it halfway to the top of the fire ring is more than sufficient.
Nestle one or two natural fire starter cubes directly into the center of the charcoal pile. Leave the top of the starters exposed to the air. Ignite the starters. Leave the heavy ceramic dome completely open for approximately 10 to 15 minutes. This allows sufficient ambient oxygen to feed the initial flame. It helps the surrounding charcoal chunks catch fire and establish a stable glowing core ember.
Once you observe a small cluster of glowing red coals, carefully replace the oiled cast iron cooking grates. Close the ceramic dome. You must now actively choke the oxygen supply to prevent the temperature from spiking out of control. Close the bottom draft door until only a quarter-inch gap remains. Adjust the top vent so the daisy wheel holes are barely open. This restricted airflow stabilizes the internal climate for the necessary low and slow burn.
The physical properties of dense ceramics dictate that rapid temperature changes are highly destructive. Precise thermal management is the most critical aspect of the entire seasoning phase.
Monitor the built-in dome thermometer closely as the grill warms up. Your absolute target temperature range for the first burn is strictly between 250 and 300 degrees Fahrenheit. This specific temperature bracket provides enough gentle heat to polymerize the oil on the cast iron and cure the gasket adhesives. It remains mild enough to protect the raw ceramic from thermal shock.
If you step away and allow the vents to remain wide open, a ceramic cooker easily surpasses 600 degrees Fahrenheit within 20 minutes. If this happens on the very first day, the microscopic moisture molecules trapped inside the factory-fresh ceramic rapidly boil and turn into steam. Because this steam cannot escape the dense clay fast enough, it causes severe structural expansion. The result is a cracked firebox or a fractured outer dome.
Once the thermometer stabilizes around 250 degrees Fahrenheit, maintain this temperature for a minimum of 2 to 3 hours. If the temperature creeps past 300 degrees, close the bottom vent to a mere sliver to reduce oxygen intake. Conversely, if it drops below 200 degrees, tap the bottom vent open slightly. This sustained duration ensures all industrial off-gassing finishes completely.
After the 3-hour mark, the active curing process is finished. Do not attempt to extinguish the glowing coals with water. This instantly shatters the ceramic. Simply close the bottom draft door completely and shut the top vent entirely. This cuts off all oxygen and naturally starves the fire. Allow the grill to cool down over several hours. Never open the lid while it is cooling. A sudden rush of cold ambient air can also induce thermal shock.
Understanding the thermal mass of your specific unit is critical for a successful first burn. Ceramic is a brilliant insulator. The thickness and overall size of the firebox directly influence how quickly the unit heats up and how long it retains that heat. Applying a one-size-fits-all approach to temperature control leads to accidental overheating.
Mid-sized units represent the industry standard for residential use due to their incredibly balanced thermal dynamics. When working with a TOPQ 18 Inch Kamado Charcoal Grill, users find temperature management highly intuitive. This model features a robust mullite ceramic shell and a precise stainless steel draft door. Because the 18-inch firebox holds a moderate amount of fuel, it is far less prone to sudden temperature spikes compared to smaller models. It also requires less charcoal to reach the target 250 degrees Fahrenheit than massive commercial units. For this specific size, filling the firebox halfway provides the perfect steady heat output to cure the adhesives safely.
Smaller ceramic grills possess a significantly lower thermal mass. The internal temperature escalates from 200 to 500 degrees Fahrenheit in a matter of minutes if the vents are left open too wide. When seasoning a compact model, monitor the dome thermometer relentlessly. The bottom draft door should be open no more than an eighth of an inch. Using just a small handful of lump charcoal is usually sufficient.
Extra-large units contain a massive amount of thick ceramic material. This immense thermal mass acts as a heat sink. It absorbs a tremendous amount of thermal energy before the ambient air inside the dome actually reaches the target temperature. Owners of large models must exercise extreme patience. It may take up to 45 minutes of slow burning before the dome thermometer registers 250 degrees Fahrenheit. Attempting to rush this process by opening the vents wider causes the charcoal to ignite too fiercely. This inevitably overshoots the target temperature once the ceramics are fully saturated with heat.
Analyzing field data and warranty claims reveals that the vast majority of ceramic grill damage occurs during the very first use. Avoiding these documented engineering pitfalls protects your equipment.
It is highly tempting to place a steak on the grates as soon as the fire is lit. Cooking during the seasoning phase is a critical error. The primary purpose of the first burn is to vaporize manufacturing residues, machine oils, and volatile organic compounds present in the high-temperature gasket adhesives. If food is placed inside the dome, the porous surface of the meat absorbs these chemical fumes. This results in food that tastes acrid and is potentially unsafe for consumption.
Petroleum-based lighter fluids and chemically soaked briquettes are strictly prohibited. Through capillary action, the unglazed ceramic matrix permanently absorbs liquid chemicals and their subsequent vapors. If lighter fluid is used, every future meal cooked in the unit carries a distinct petrochemical flavor. If chemical fluid was used accidentally, the only potential remedy involves conducting multiple high-heat prolonged burns using pure hardwood charcoal to incinerate the absorbed chemicals. Complete eradication is rarely successful.
Allowing the grill to exceed 300 degrees Fahrenheit during the first burn is the leading cause of micro-fractures in the ceramic shell. If you notice the temperature gauge climbing rapidly past 300 degrees, do not panic. Absolutely do not open the dome. Opening the dome introduces a massive rush of oxygen, causing the fire to flare up further. Immediately close the bottom draft door completely, and close the top vent until only a tiny sliver remains open. Starving the fire of oxygen forces the temperature to stabilize and drop.
Once the low-temperature burn is complete, the active phase of seasoning is over. The shutdown and cleanup procedures are equally important to prepare the unit for actual culinary use.
After closing all vents, the fire slowly suffocates. Allow the grill to cool down completely and naturally. This takes anywhere from 12 to 24 hours depending on the ambient outdoor temperature. Never attempt to remove ash while the unit is still warm. Once the grill is completely cold to the touch, open the bottom draft door. Use the designated ash tool to scrape the fine particulate ash out of the bottom chamber. Keeping the draft door clear of ash is essential for maintaining precise airflow.
During the seasoning burn, the thin layer of high smoke-point oil you applied to the cast iron components polymerized into a hard rust-resistant layer. Before placing food on the grates for your first actual cook, apply one more very light coat of cooking oil using a paper towel. This reinforces the non-stick surface. It ensures delicate proteins like fish or chicken skin release easily from the metal.
If you have carefully followed these temperature guidelines, your 18 Inch Kamado Charcoal Grill is now prepared for heavy-duty culinary use. The ceramics are fully dehydrated and acclimated to heat. The high-temperature felt gaskets are securely bonded to the rims. The cast iron components are shielded against oxidation. You are now safely equipped to transition from low-and-slow smoking to high-heat searing without fear of damaging your equipment.
No. You must never apply cooking oil, water, or any cleaning solvents to the unglazed ceramic interior of the firebox or the dome. The term seasoning in the context of ceramic grills refers exclusively to conducting a dry low-temperature burn to cure the adhesives and acclimate the ceramics to heat. The only parts that require a physical coating of oil are the cast iron cooking grates and the cast iron top vent. The interior ceramic is designed to remain porous so it can absorb and reflect moisture, which is what keeps meat juicy during long cooking sessions.
The highly controlled low-heat ceramic first burn is a strict one-time process required only when the grill is brand new out of the box. Once the ceramics are cured, they do not need to be cured again. However, the maintenance of the metal components is ongoing. You should re-season your cast iron grates and the top daisy wheel with a high smoke-point oil every few months, at the beginning of a new grilling season, or immediately if you notice any surface rust developing.
Emitting thick white or slightly foul-smelling smoke is completely normal and expected during the first 30 to 60 minutes of the seasoning process. This visible smoke is the physical manifestation of factory dust, residual machine oils, and volatile compounds in the gasket adhesives burning off. As the grill maintains a steady 250 degrees Fahrenheit, these impurities will be entirely vaporized. You will know the process is working when the thick white smoke transitions into a thin, nearly invisible, clean blue smoke, indicating pure charcoal combustion.
The use of standard charcoal briquettes is highly discouraged by grill engineers. Briquettes are typically manufactured with sawdust, chemical binders, and fillers that produce an excessive amount of fine ash. In a Kamado Charcoal Grill, this heavy ash production can quickly clog the airflow holes in the fire grate, suffocating the fire and making temperature control impossible. Furthermore, the chemical additives in briquettes can seep into the porous ceramic. Always use pure natural hardwood lump charcoal for clean burning, minimal ash, and optimal thermal control.
If the temperature rapidly exceeds the safe seasoning range, the trapped moisture inside the fresh ceramic expands faster than it can escape. This internal pressure leads to structural micro-fractures or complete cracking. To fix a spiking temperature, immediately close the bottom draft door entirely and leave only a sliver of the top vent open to choke the oxygen supply. Never open the dome during a temperature spike.
It is generally not recommended for the very first burn. Chimney starters create a concentrated, intensely hot pile of coals very quickly. Dumping glowing hot coals directly into a cold unseasoned firebox can cause localized thermal shock. Lighting the charcoal slowly inside the firebox with natural fire starters is much safer for brand-new equipment.
Patience is the ultimate engineering key to success when breaking in a new ceramic cooker. Facilitating a slow and controlled burn protects the internal ceramics and properly cures the high-temperature gaskets. This simple procedure is a strict one-time requirement that guarantees the longevity of your outdoor kitchen investment. If you are looking to upgrade your backyard setup, explore the full range of professional-grade TOPQ ceramic grills. Find the perfect size and specifications to match your culinary ambitions, grab your natural lump charcoal, and start planning your first official feast today.


